새소식
반응형
API 개발 시에 개발할 API에 대한 정보를 시각적으로 표현된 것을 보기 위해서 종종 API 문서를 만들곤 합니다. Swagger라는 open-source 툴을 통해 이러한 작업을 할 수 있는데 NestJS에서도 Swagger와 관련된 라이브러리를 지원하기 때문에 이를 사용하여 API 문서화와 각 엔드포인트에 대한 테스팅을 진행하는 방식에 대해서 알아보도록 하겠습니다.
OpenAPI 사양은 언어에 구애받지 않는 정의 형식으로 RESTful API를 설명하는 데 사용됩니다. Nest는 데코레이터를 활용하여 이러한 사양을 생성할 수 있는 전용 모듈을 제공합니다.
Swagger는 일반적으로 RESTful API를 디자인하고 구축하고 문서화할 때 사용하는 도구의 모음을 제공합니다. 이러한 도구 중에서 가장 눈에 띄는 것은 바로 Swagger UI인데요. 이는 어떠한 프론트엔드 개발을 하지 않고도 특정 웹페이지를 통해 API의 엔드포인트와의 상호작용하는 시각적인 플랫폼을 제공합니다.
Swagger 사용을 위해서 관련된 라이브러리를 먼저 설치해 주어야 합니다.
다음 명령어를 통해 라이브러리를 설치할 수 있습니다.
npm install @nestjs/swagger swagger-ui-express
설치 프로세스가 완료되면 main.ts 파일을 열고 SwaggerModule 클래스를 사용하여 Swagger 설정을 초기화합니다:
import { NestFactory } from '@nestjs/core';
import { SwaggerModule, DocumentBuilder } from '@nestjs/swagger';
import { AppModule } from './app.module';

async function bootstrap() {
  const app = await NestFactory.create(AppModule);
  const options = new DocumentBuilder()
    .setTitle('Your API Title')
    .setDescription('Your API description')
    .setVersion('1.0')
    .addServer('http://localhost:3000/', 'Local environment')
    .addServer('https://staging.yourapi.com/', 'Staging')
    .addServer('https://production.yourapi.com/', 'Production')
    .addTag('Your API Tag')
    .build();

const document = SwaggerModule.createDocument(app, options);
  SwaggerModule.setup('api-docs', app, document);

await app.listen(process.env.PORT || 3000);
}
bootstrap();
document(SwaggerModule#createDocument() 메서드에서 반환하는 객체)는 OpenAPI Document를 준수하는 직렬화 가능한 객체입니다. HTTP를 통해 호스팅하는 대신 JSON/YAML 파일로 저장하여 다양한 방식으로 사용할 수도 있습니다.
DocumentBuilder는 OpenAPI 사양을 준수하는 기본 문서를 구성하는 데 도움이 됩니다. 해당 클래스를 통해 제목, 설명, 버전 등과 같은 속성을 설정할 수 있는 여러 메서드를 제공합니다.
전체 문서(모든 HTTP 경로가 정의된)를 생성하려면 SwaggerModule 클래스의 createDocument() 메서드를 사용합니다. 이 메서드는 애플리케이션 인스턴스(app)와 Swagger 옵션 객체(options)라는 두 가지 인자를 받습니다.
또는 세 번째 인자를 제공할 수 있는데, 이 인자는 SwaggerDocumentOptions 타입이어야 합니다.
document를 생성하고 나면 setup() 메서드를 호출할 수 있는데, 해당 메서드는 다음과 같은 인자를 받습니다:
이제 다음 명령을 실행하여 HTTP 서버를 시작합니다.
$ npm run start
위와 같은 세팅을 마치게 되면, 우리는 이제 http://localhost:3000/api-docs 에서 Swagger UI를 볼 수 있게 됩니다.
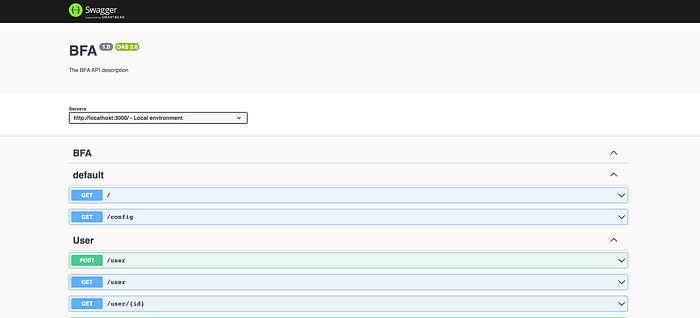
이로써 .yml 또는 .json 파일을 수동으로 작성하는 지루한 작업은 이제 더 이상 하지 않아도 됩니다.
NestJS는 자동 문서 생성을 위해 Swagger와 원활하게 통합하는 데코레이터를 제공합니다.
document를 만들 때 라이브러리의 동작을 미세 조정하기 위해 몇 가지 추가 옵션을 제공할 수 있습니다. 이러한 옵션은 SwaggerDocumentOptions 타입이어야 하며, 여기에는 다음과 같은 옵 션을 포함할 수 있습니다:
export interface SwaggerDocumentOptions {
  /**
   * List of modules to include in the specification
   */
  include?: Function[];

  /**
   * Additional, extra models that should be inspected and included in the specification
   */
  extraModels?: Function[];

  /**
   * If `true`, swagger will ignore the global prefix set through `setGlobalPrefix()` method
   */
  ignoreGlobalPrefix?: boolean;

  /**
   * If `true`, swagger will also load routes from the modules imported by `include` modules
   */
  deepScanRoutes?: boolean;

  /**
   * Custom operationIdFactory that will be used to generate the `operationId`
   * based on the `controllerKey` and `methodKey`
   * @default () => controllerKey_methodKey
   */
  operationIdFactory?: (controllerKey: string, methodKey: string) => string;
}
예를 들어 라이브러리에서 UserController_createUser 대신 createUser와 같은 작업 이름을 생성하도록 하려면 다음과 같이 설정할 수 있습니다:
const options: SwaggerDocumentOptions =  {
  operationIdFactory: (
    controllerKey: string,
    methodKey: string
  ) => methodKey
};
const document = SwaggerModule.createDocument(app, config, options);
SwaggerModule#setup 메서드의 네 번째 인자로 ExpressSwaggerCustomOptions(express를 사용하는 경우) 인터페이스를 충족하는 options 객체를 전달함으로써 Swagger UI를 구성할 수 있습니다.
export interface ExpressSwaggerCustomOptions {
  explorer?: boolean;
  swaggerOptions?: Record<string, any>;
  customCss?: string;
  customCssUrl?: string;
  customJs?: string;
  customfavIcon?: string;
  customSwaggerUiPath?: string;
  swaggerUrl?: string;
  customSiteTitle?: string;
  validatorUrl?: string;
  url?: string;
  urls?: Record<'url' | 'name', string>[];
  patchDocumentOnRequest?: <TRequest = any, TResponse = any> (req: TRequest, res: TResponse, document: OpenAPIObject) => OpenAPIObject;
}
SwaggerModule은 라우트 핸들러의 모든 @Body(), @Query(), @Param() 데코레이터를 검색하여 API 문서를 생성합니다. 또한 Reflection을 활용하여 해당 모델 정의를 생성합니다. 다음 코드를 봅시다:
@Post()
async create(@Body() createCatDto: CreateCatDto) {
  this.catsService.create(createCatDto);
}
body 정의를 명시적으로 설정하려면 @ApiBody() 데코레이터(@nestjs/swagger 패키지에서 가져온)를 사용합니다.
CreateCatDto를 기반으로 아래 이미지처럼 모델이 정의된 Swagger UI가 생성됩니다:

보시다시피 클래스에 몇 가지 선언된 속성이 있지만 정의는 비어 있습니다. 클래스 속성을 이 SwaggerModule에 표시하려면 @ApiProperty() 데코레이터로 주석을 달거나, 자동으로 처리하는 CLI 플러그인(플러그인 섹션에서 자세히 설명하겠습니다.)을 사용해야 합니다:
import { ApiProperty } from '@nestjs/swagger';

export class CreateCatDto {
  @ApiProperty()
  name: string;

  @ApiProperty()
  age: number;

  @ApiProperty()
  breed: string;
}
이렇게 각 속성에 수동으로 주석을 다는 것보다 자동으로 주석을 제공하는 Swagger 플러그인(플러그인 섹션 참조)을 사용하는 것이 좋습니다.
그럼 이제 브라우저를 열고 생성된 CreateCatDto 모델을 확인해 보겠습니다:

또한 @ApiProperty() 데코레이터를 사용하면 다양한 스키마 객체 속성을 설정할 수 있습니다:
@ApiProperty({
  description: 'The age of a cat',
  minimum: 1,
  default: 1,
})
age: number;
@ApiProperty({ required : false })를 명시적으로 입력하는 대신 @ApiPropertyOptional() 단축 데코레이터를 사용할 수 있습니다.
속성의 타입을 명시적으로 설정하려면 다음과 같이 type 키를 사용합니다:
@ApiProperty({
  type: Number,
})
age: number;
프로퍼티가 배열인 경우 아래와 같이 배열 유형을 수동으로 표시해야 합니다:
@ApiProperty({ type: [String] })
names: string[];
배열을 자동으로 감지하는 Swagger 플러그인(플러그인 섹션 참조)을 사용하는 것도 고려해볼 수 있습니다.
위와 같이 type을 배열의 첫 번째 요소로 포함하거나 isArray 속성을 true로 설정합니다.
클래스 간에 순환 종속성이 있는 경우, 지연 함수(lazy function)를 사용하여 SwaggerModule에 유형 정보를 제공하세요:
@ApiProperty({ type: () => Node })
node: Node;
TypeScript는 제네릭이나 인터페이스에 대한 메타데이터를 저장하지 않으므로, DTO에서 제네릭이나 인터페이스를 사용할 경우 SwaggerModule이 런타임 시에 모델 정의를 제대로 생성하지 못할 수 있습니다.
예를 들어, 다음 코드는 그러한 이유로 Swagger 모듈에서 올바르게 검사되지 않습니다:
createBulk(@Body() usersDto: CreateUserDto[])
이 문제를 해결하기 위해선 타입을 명시적으로 설정해야 합니다:
@ApiBody({ type: [CreateUserDto] })
createBulk(@Body() usersDto: CreateUserDto[])
Enum을 식별하려면 @ApiProperty에서 enum 속성값을 배열을 통해 수동으로 설정해야 합니다.
@ApiProperty({ enum: ['Admin', 'Moderator', 'User']})
role: UserRole;
아니면 다음과 같이 실제 타입스크립트 enum을 정의할 수도 있습니다.
export enum UserRole {
  Admin = 'Admin',
  Moderator = 'Moderator',
  User = 'User',
}
그런 다음 @Query() 매개변수 데코레이터와 함께 @ApiQuery() 데코레이터를 사용하여 enum을 직접 사용할 수 있습니다.
@ApiQuery({ name: 'role', enum: UserRole })
async filterByRole(@Query('role') role: UserRole = UserRole.User) {}

isArray를 true로 설정하면 enum을 다중 선택으로 선택할 수도 있습니다:

기본적으로 enum 속성은 매개변수에 enum에 대한 원시 정의(raw definition)를 추가합니다.
- breed:
    type: 'string'
    enum:
      - Persian
      - Tabby
      - Siamese
위와 같은 specification은 대부분의 경우 정상적으로 작동하긴 합니다. 그러나 specification을 입력으로 받아 클라이언트 측 코드를 생성하는 도구를 사용하는 경우 생성된 코드에 중복된 enum이 포함되어 있는 문제가 발생할 수 있습니다. 다음 코드 스니펫을 살펴봅시다:
// generated client-side code
export class CatDetail {
  breed: CatDetailEnum;
}

export class CatInformation {
  breed: CatInformationEnum;
}

export enum CatDetailEnum {
  Persian = 'Persian',
  Tabby = 'Tabby',
  Siamese = 'Siamese',
}

export enum CatInformationEnum {
  Persian = 'Persian',
  Tabby = 'Tabby',
  Siamese = 'Siamese',
}
완전히 동일한 enum 두 개가 생긴 것을 볼 수 있습니다. 이 문제를 해결하려면 데코레이터에서 enum 프로퍼티와 함께 enumName을 전달하면 됩니다.
export class CatDetail {
  @ApiProperty({ enum: CatBreed, enumName: 'CatBreed' })
  breed: CatBreed;
}
enumName 속성을 사용하면 @nestjs/swagger가 CatBreed를 자체 스키마로 전환하여 CatBreed enum을 재사용할 수 있게 됩니다. 사양은 다음과 같습니다:
CatDetail:
  type: 'object'
  properties:
    ...
    - breed:
        schema:
          $ref: '#/components/schemas/CatBreed'
CatBreed:
  type: string
  enum:
    - Persian
    - Tabby
    - Siamese
enum을 속성으로 갖는 모든 데코레이터는 enumName도 가져야 합니다.
일부 특정 시나리오(예: 깊게 중첩된 배열, 행렬)에서는 타입을 직접 묘사 해야 할 수도 있습니다.
@ApiProperty({
  type: 'array',
  items: {
    type: 'array',
    items: {
      type: 'number',
    },
  },
})
coords: number[][];
마찬가지로 컨트롤러 클래스에서 입력/출력 콘텐츠를 수동으로 정의하려면 스키마 속성을 사용하세요:
@ApiBody({
  schema: {
    type: 'array',
    items: {
      type: 'array',
      items: {
        type: 'number',
      },
    },
  },
})
async create(@Body() coords: number[][]) {}
컨트롤러에서 직접 참조되지는 않지만 Swagger 모듈에서 검사해야 하는 추가 모델을 정의하려면 @ApiExtraModels() 데코레이터를 사용하세요:
또는 다음과 같이 SwaggerModule#createDocument() 메서드에 extraModels 속성이 지정된 옵션 객체를 전달할 수 있습니다:
const document = SwaggerModule.createDocument(app, options, {
  extraModels: [ExtraModel],
});
모델에 대한 참조($ref)를 가져오려면 getSchemaPath(ExtraModel) 함수를 사용합니다.
스키마를 결합하려면 oneOf, anyOf 또는 allOf 키워드를 사용할 수 있습니다.
@ApiProperty({
  oneOf: [
    { $ref: getSchemaPath(Cat) },
    { $ref: getSchemaPath(Dog) },
  ],
})
pet: Cat | Dog;
다형성 배열(즉, 멤버가 여러 스키마에 걸쳐 있는 배열)을 정의하려면 원시 정의(위 참조)를 사용하여 직접 일일히 유형을 정의해야 합니다.
type Pet = Cat | Dog;

@ApiProperty({
  type: 'array',
  items: {
    oneOf: [
      { $ref: getSchemaPath(Cat) },
      { $ref: getSchemaPath(Dog) },
    ],
  },
})
pets: Pet[];
여기서 Cat과 Dog는 모두 (클래스 수준에서) @ApiExtraModels() 데코레이터를 사용하여 추가 모델로 정의해야 합니다.
OpenAPI 용어에서 경로(path)는 API가 노출하는 /users 또는 /reports/summary와 같은 엔드포인트(리소스)이며, operation은 이러한 경로를 조작하는 데 사용되는 GET, POST 또는 DELETE와 같은 HTTP 메서드입니다.
특정 태그에 컨트롤러를 첨부하려면 @ApiTags(...태그) 데코레이터를 사용합니다.
@ApiTags('cats')
@Controller('cats')
export class CatsController {}
요청의 일부로 예상되는 사용자 지정 헤더를 정의하려면 @ApiHeader()를 사용합니다.
@ApiHeader({
  name: 'X-MyHeader',
  description: 'Custom header',
})
@Controller('cats')
export class CatsController {}
사용자 지정 HTTP 응답을 정의하려면 @ApiResponse() 데코레이터를 사용합니다.
@Post()
@ApiResponse({ status: 201, description: 'The record has been successfully created.'})
@ApiResponse({ status: 403, description: 'Forbidden.'})
async create(@Body() createCatDto: CreateCatDto) {
  this.catsService.create(createCatDto);
}
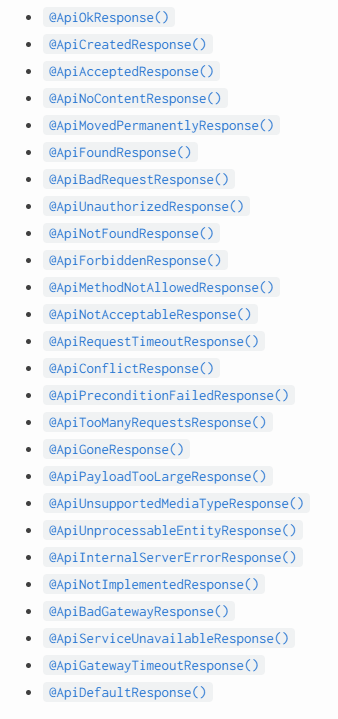
애플리케이션에서 응답은 되게 다양할 수 있는데 이에 맞춰 Nest에서도 이러한 @ApiResponse 데코레이터를 상속하는 간단한 API 응답 데코레이터 집합을 제공합니다:
@Post()
@ApiCreatedResponse({ description: 'The record has been successfully created.'})
@ApiForbiddenResponse({ description: 'Forbidden.'})
async create(@Body() createCatDto: CreateCatDto) {
  this.catsService.create(createCatDto);
}
요청에 대한 반환 모델을 지정하려면 클래스를 생성하고 모든 프로퍼티에 @ApiProperty() 데코레이터를 사용하여 주석을 달아야 합니다.
export class Cat {
  @ApiProperty()
  id: number;

  @ApiProperty()
  name: string;

  @ApiProperty()
  age: number;

  @ApiProperty()
  breed: string;
}
그런 다음 Cat 모델을 응답 데코레이터의 type 속성과 함께 사용할 수 있습니다.
@ApiTags('cats')
@Controller('cats')
export class CatsController {
  @Post()
  @ApiCreatedResponse({
    description: 'The record has been successfully created.',
    type: Cat,
  })
  async create(@Body() createCatDto: CreateCatDto): Promise<Cat> {
    return this.catsService.create(createCatDto);
  }
}
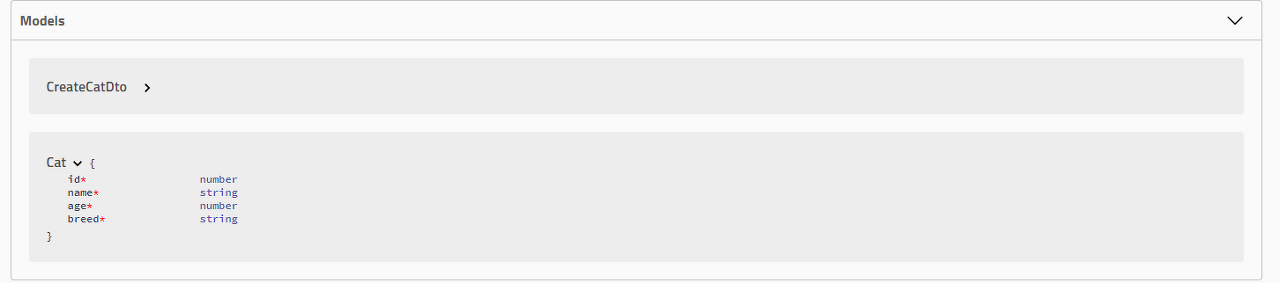
브라우저를 열고 생성된 고양이 모델을 확인해 보면 아래와 같습니다:
@ApiBody 데코레이터를 @ApiConsumes()와 함께 사용하면 특정 메소드에 대한 파일 업로드를 활성화할 수 있습니다. 다음은 파일 업로드 기법을 사용한 전체 예시입니다:
@UseInterceptors(FileInterceptor('file'))
@ApiConsumes('multipart/form-data')
@ApiBody({
  description: 'List of cats',
  type: FileUploadDto,
})
uploadFile(@UploadedFile() file) {}
여기서 FileUploadDto는 다음과 같이 정의되어 있습니다:
class FileUploadDto {
  @ApiProperty({ type: 'string', format: 'binary' })
  file: any;
}
여러 파일 업로드를 처리하려면 다음과 같이 FilesUploadDto를 정의하면 됩니다:
class FilesUploadDto {
  @ApiProperty({ type: 'array', items: { type: 'string', format: 'binary' } })
  files: any[];
}
요청에 extestion를 추가하려면 @ApiExtension() 데코레이터를 사용합니다. 확장자 이름 앞에 x-를 붙여야 합니다.
@ApiExtension('x-foo', { hello: 'world' })
raw definition를 제공하는 기능을 사용하면 Swagger UI에 대한 일반 스키마를 정의할 수 있습니다. 다음과 같은 DTO가 있다고 가정합니다:
export class PaginatedDto<TData> {
  @ApiProperty()
  total: number;

  @ApiProperty()
  limit: number;

  @ApiProperty()
  offset: number;

  results: TData[];
}
나중에 raw definition을 제공할 것이기 때문에 results의 데코레이터는 생략합 니다. 이제 다른 DTO를 정의하고 예를 들어 다음과 같이 CatDto로 이름을 지정해 보겠습니다:
export class CatDto {
  @ApiProperty()
  name: string;

  @ApiProperty()
  age: number;

  @ApiProperty()
  breed: string;
}
이렇게 하면 다음과 같이 PaginatedDto<CatDto> 응답을 정의할 수 있습니다:
@ApiOkResponse({
  schema: {
    allOf: [
      { $ref: getSchemaPath(PaginatedDto) },
      {
        properties: {
          results: {
            type: 'array',
            items: { $ref: getSchemaPath(CatDto) },
          },
        },
      },
    ],
  },
})
async findAll(): Promise<PaginatedDto<CatDto>> {}
이 예제에서는 응답에 allOf PaginatedDto가 있고 결과 속성은 Array<CatDto> 유형이 되도록 지정합니다.
주어진 모델에 대한 OpenAPI 사양 파일 내에서 OpenAPI 스키마 경로를 반환하는 getSchemaPath() 함수를 사용합니다.
allOf는 다양한 상속 관련 사용 사례를 다루기 위해 OAS 3에서 제공하는 개념입니다.
마지막으로, PaginatedDto는 컨트롤러에서 직접 참조하지 않기 때문에 SwaggerModule은 아직 해당 모델 정의를 생성할 수 없습니다. 이 경우 추가 모델로 추가해야 합니다. 예를 들어 다음과 같이 컨트롤러 수준에서 @ApiExtraModels() 데코레이터를 사용할 수 있습니다:
@Controller('cats')
@ApiExtraModels(PaginatedDto)
export class CatsController {}
이제 Swagger를 실행하면 이 특정 엔드포인트에 대해 생성된 swagger.json에 다음과 같은 응답이 정의되어 있어야 합니다:
"responses": {
  "200": {
    "description": "",
    "content": {
      "application/json": {
        "schema": {
          "allOf": [
            {
              "$ref": "#/components/schemas/PaginatedDto"
            },
            {
              "properties": {
                "results": {
                  "$ref": "#/components/schemas/CatDto"
                }
              }
            }
          ]
        }
      }
    }
  }
}
이를 재사용할 수 있게 하려면 다음과 같이 PaginatedDto에 대한 사용자 정의 데코레이터를 만들면 됩니다:
export const ApiPaginatedResponse = <TModel extends Type<any>>(
  model: TModel,
) => {
  return applyDecorators(
    ApiExtraModels(PaginatedDto, model),
    ApiOkResponse({
      schema: {
        allOf: [
          { $ref: getSchemaPath(PaginatedDto) },
          {
            properties: {
              results: {
                type: 'array',
                items: { $ref: getSchemaPath(model) },
              },
            },
          },
        ],
      },
    }),
  );
};
SwaggerModule이 모델에 대한 정의를 생성하도록 하려면 앞서 컨트롤러의 PaginatedDto에서 했던 것처럼 extra model로 추가해야 합니다.
이렇게 하면 엔드포인트에서 사용자 정의 @ApiPaginatedResponse() 데코레이터를 사용할 수 있습니다:
@ApiPaginatedResponse(CatDto)
async findAll(): Promise<PaginatedDto<CatDto>> {}
client generator 툴의 경우, 이 접근 방식은 클라이언트에 대해 PaginatedResponse<TModel>이 생성되는 방식이 모호합니다. 다음 스니펫은 위의 'GET /' 엔드포인트에 대한 클라이언트 generator 결과의 예시입니다.
// Angular
findAll(): Observable<{ total: number, limit: number, offset: number, results: CatDto[] }>
보시다시피 여기서는 반환 타입이 모호합니다. 이 문제를 해결하려면 ApiPaginatedResponse의 스키마에 title 속성을 추가하면 됩니다:
export const ApiPaginatedResponse = <TModel extends Type<any>>(model: TModel) => {
  return applyDecorators(
    ApiOkResponse({
      schema: {
        title: `PaginatedResponseOf${model.name}`,
        allOf: [
          // ...
        ],
      },
    }),
  );
};
이제 client generator 툴의 결과가 나타납니다:
// Angular
findAll(): Observable<PaginatedResponseOfCatDto>
특정 작업에 어떤 보안 메커니즘을 사용해야 하는지 정의하려면 @ApiSecurity() 데코레이터를 사용합니다.
@ApiSecurity('basic')
@Controller('cats')
export class CatsController {}
애플리케이션을 실행하기 전에 DocumentBuilder를 사용하여 기본 문서에 보안 정의를 추가하는 것을 잊으면 안됩니다.
const options = new DocumentBuilder().addSecurity('basic', {
  type: 'http',
  scheme: 'basic',
});
가장 많이 사용되는 authentication 기술 중 일부는 기본으로 제공되므로(예: basic 및 bearer) 위와 같이 보안 메커니즘을 수동으로 정의할 필요는 없습니다.
basic athentication을 사용하려면 @ApiBasicAuth()를 사용합니다.
@ApiBasicAuth()
@Controller('cats')
export class CatsController {}
이 역시도 애플리케이션을 실행 코드 앞에 DocumentBuilder를 사용하여 기본 문서에 보안 정의를 추가하는 것을 잊지맙시다:
const options = new DocumentBuilder().addBasicAuth();
bearer authentication을 사용하려면 @ApiBearerAuth()를 사용합니다.
@ApiBearerAuth()
@Controller('cats')
export class CatsController {}
const options = new DocumentBuilder().addBearerAuth();
OAuth2를 사용하려면 @ApiOAuth2()를 사용합니다
@ApiOAuth2(['pets:write'])
@Controller('cats')
export class CatsController {}
const options = new DocumentBuilder().addOAuth2();
cookie athentication를 사용하려면 @ApiCookieAuth()를 사용합니다
@ApiCookieAuth()
@Controller('cats')
export class CatsController {}
const options = new DocumentBuilder().addCookieAuth('optional-session-id');
사용할 수 있는 모든 OpenAPI 데코레이터에는 핵심 데코레이터와 구분하기 위해 앞에 'API' 접두사가 붙습니다. 아래는 내보낸 데코레이터의 전체 목록과 함께 데코레이터를 적용할 수 있는 레벨을 명시한 것입니다.
| @ApiBasicAuth() | Method / Controller |
| @ApiBearerAuth() | Method / Controller |
| @ApiBody() | Method |
| @ApiConsumes() | Method / Controller |
| @ApiCookieAuth() | Method / Controller |
| @ApiExcludeController() | Controller |
| @ApiExcludeEndpoint() | Method |
| @ApiExtension() | Method |
| @ApiExtraModels() | Method / Controller |
| @ApiHeader() | Method / Controller |
| @ApiHideProperty() | Model |
| @ApiOAuth2() | Method / Controller |
| @ApiOperation() | Method |
| @ApiParam() | Method |
| @ApiProduces() | Method / Controller |
| @ApiProperty() | Model |
| @ApiPropertyOptional() | Model |
| @ApiQuery() | Method |
| @ApiResponse() | Method / Controller |
| @ApiSecurity() | Method / Controller |
| @ApiTags() | Method / Controller |
TypeScript의 메타데이터 reflection 시스템에는 몇 가지 제약이 있습니다.
예를 들어 클래스가 어떤 속성으로 구성되어 있는지 확인하거나 주어진 속성이 선택 사항인지 필수 사항인지 인식하는 것이 불가능한 경우가 있겠습니다.
그러나 이러한 제약 조건 중 일부는 컴파일 시 해결할 수 있습니다. Nest는 필요한 boilerplate 코드의 양을 줄이기 위해 TypeScript 컴파일 프로세스를 개선하는 플러그인을 제공합니다.
이 플러그인은 opt-in입니다. 원하는 경우 모든 데코레이터를 수동으로 선언하거나 필요한 곳에 특정 데코레이터만 선언할 수 있습니다.
Swagger 플로그인은 자동으로 다음과 같은 작업을 처리할 수 있습니다.
파일 이름에는 반드시 다음 접미사 중 하나가 포함되어야 합니다: ['.dto.ts', '.entity.ts'](예: create-user.dto.ts)가 있어야 플러그인에서 분석할 수 있습니다.
다른 접미사를 사용하는 경우에는 dtoFileNameSuffix 옵션을 지정하여 플러그인의 동작을 조정해야 합니다(아래 참조).
이전에는 Swagger UI로 대화형 경험을 제공하려면 사양에서 모델/컴포넌트를 어떻게 선언해야 하는지 패키지에 알리기 위해 많은 코드를 복제해야 했습니다.
예를 들어 다음과 같이 간단한 CreateUserDto 클래스를 정의할 수 있습니다:
export class CreateUserDto {
  @ApiProperty()
  email: string;

  @ApiProperty()
  password: string;

  @ApiProperty({ enum: RoleEnum, default: [], isArray: true })
  roles: RoleEnum[] = [];

  @ApiProperty({ required: false, default: true })
  isEnabled?: boolean = true;
}
중간 정도 규모의 프로젝트에서는 큰 문제가 되지 않지만, 클래스가 많아지면 장황해지고 유지 관리가 어려워질 것입니다.
Swagger 플러그인을 활성화하면 위의 클래스 정의를 간단하게 선언할 수 있습니다:
export class CreateUserDto {
  email: string;
  password: string;
  roles: RoleEnum[] = [];
  isEnabled?: boolean = true;
}
Swagger 플러그인은 TypeScript 유형 및 클래스 유효성 검사기 데코레이터에서 @ApiProperty() 어노테이션을 파생합니다. 이는 생성된 Swagger UI 문서에 대한 API를 명확하게 설명하는 데 도움이 됩니다. 그러나 런타임에 유효성 검사는 여전히 class-validator 데코레이터가 처리합니다. 따라서 @IsEmail(), @IsNumber() 등과 같은 유효성 검사기를 계속 사용해야 합니다.
따라서 문서 생성을 위한 자동 어노테이션에 의존하면서도 런타임 유효성 검사를 원하는 경우 class-validator 데코레이터역시 여전히 필요합니다.
DTO에서 mapped types 유틸리티(예: PartialType)를 사용하는 경우 플러그인이 스키마를 가져올 수 있도록 @nestjs/mapped-types 대신 @nestjs/swagger에서 해당 유틸리티를 가져옵니다.
플러그인은 추상 구문 트리를 기반으로 적절한 데코레이터를 즉시 추가합니다. 따라서 코드 곳곳에 흩어져 있는 @ApiProperty 데코레이터로 고생할 필요가 없습니다.
플러그인은 누락된 Swagger 속성을 자동으로 생성하지만, 재정의가 필요한 경우 @ApiProperty()를 통해 명시적으로 설정하기만 하면 됩니다.
comments introspection 기능을 활성화하면 CLI 플러그인이 comment를 기반으로 속성에 대한 설명과 예제 값을 생성합니다.
예를 들어 다음과 같은 role 속성의 예가 있습니다:
/**
 * A list of user's roles
 * @example ['admin']
 */
@ApiProperty({
  description: `A list of user's roles`,
  example: ['admin'],
})
roles: RoleEnum[] = [];
여기서 description과 example 값을 모두 복제해야 합니다. introspectComments를 활성화하면 CLI 플러그인이 이러한 주석을 추출하여 속성에 대한 설명(정의된 경우 예제)을 자동으로 제공할 수 있습니다. 그러면 이제 위의 프로퍼티는 다음과 같이 간단하게 선언할 수 있습니다:
/**
 * A list of user's roles
 * @example ['admin']
 */
roles: RoleEnum[] = [];
플러그인에서 각각 @ApiProperty 및 @ApiOperation 데코레이터의 값을 설정하는 방법을 커스터마이징하는 데 사용할 수 있는 dtoKeyOfComment 및 controllerKeyOfComment 플러그인 옵션이 있습니다. 다음 예시를 살펴봅시다:
export class SomeController {
  /**
   * Create some resource
   */
  @Post()
  create() {}
}
기본적으로 이러한 옵션은 "description"으로 설정되어 있습니다. 즉, 플러그인은 아래와 같이 ApiOperation 연산자의 description 키에 "Create some resource"를 할당합니다.
@ApiOperation({ description: "Create some resource" })
플러그인을 활성화하려면 nest-cli.json(Nest CLI를 사용하는 경우)을 열고 다음 플러그인 구성을 추가합니다:
{
  "collection": "@nestjs/schematics",
  "sourceRoot": "src",
  "compilerOptions": {
    "plugins": ["@nestjs/swagger"]
  }
}
options 속성을 사용하여 플러그인의 동작을 사용자 정의할 수도 있습니다.
"plugins": [
  {
    "name": "@nestjs/swagger",
    "options": {
      "classValidatorShim": false,
      "introspectComments": true
    }
  }
]
옵션 속성은 다음 인터페이스를 충족해야 합니다:
export interface PluginOptions {
  dtoFileNameSuffix?: string[];
  controllerFileNameSuffix?: string[];
  classValidatorShim?: boolean;
  dtoKeyOfComment?: string;
  controllerKeyOfComment?: string;
  introspectComments?: boolean;
}
| Option | Default | Description |
| dtoFileNameSuffix | ['.dto.ts', '.entity.ts'] | DTO (Data Transfer Object) files suffix |
| controllerFileNameSuffix | .controller.ts | Controller files suffix |
| classValidatorShim | true | If set to true, the module will reuse class-validator validation decorators (e.g. @Max(10) will add max: 10 to schema definition) |
| dtoKeyOfComment | 'description' | The property key to set the comment text to on ApiProperty. |
| controllerKeyOfComment | 'description' | The property key to set the comment text to on ApiOperation. |
| introspectComments | false | If set to true, plugin will generate descriptions and example values for properties based on comments |
플러그인 옵션이 업데이트될 때마다 /dist 폴더를 삭제하고 애플리케이션을 다시 빌드해야 합니다. CLI를 사용하지 않고 custom webpack을 구성한 경우 이 플러그인을 ts-loader와 함께 사용할 수 있습니다:
getCustomTransformers: (program: any) => ({
  before: [require('@nestjs/swagger/plugin').before({}, program)]
}),
| [NestJS] Validation(검증) 심화버전 (1) | 2024.01.25 |
|---|---|
| [NestJS] NestJS CLI로 REST API를 사용한 CRUD 기능 만들기(5분버전 vs. 심화버전) with TypeORM & MySQL (0) | 2024.01.24 |
| [NestJS] NestJS 시작 (설치 & 구성요소 맛보기) (3) | 2024.01.22 |
| [NestJS] NestJS를 위한 선수지식 Node.js & Express.js 이해 (feat. Logging, 폴더 구조) (0) | 2024.01.21 |
| [NestJS] NestJS와 관련된 기술 용어 정리 (DI, IoC, AOP 등...) (0) | 2024.01.19 |
소중한 공감 감사합니다